Hey guys, its me again. Sorry for being slow on my blog update. Unfortunately there is an incident that has befall my phone quite some time ago. Below is the picture of it.


My heart shattered together with the phone. I do know that the cost is going to be quite high if I were to fix it. I even asked the phone repair shop estimated to as high as RM500 (T.T)
That is way out of my budget and I might as well buy a new phone with that amount of money.
BUT I do love the phone and being apart with it would be the last thing that I would like to do.
Then I figured, "why not I just fix it myself?" It should not be that hard to replace if I know the way around.
WARNING: ONLY DO THIS IF YOU HAVE THE CONFIDENCE TO DO SO. I WOULD NOT BE HELD RESPONSIBLE FOR ANY MISHAP THAT HAPPENS DURING YOUR VERY OWN DIY BUT I CAN ASSURE YOU IF YOU FOLLOW THE STEPS CAREFULLY, THERE SHOULD BE NO PROBLEM ARISE.
PROMOTION: IF YOU WANT ME TO DO THE SERVICE, I CAN DO IT FOR SOME SERVICE CHARGE AND THE COST OF THE REPLACEMENT PART. JUST PM HERE OR CONTACT ME AT MY EMAIL. COD AT SRI ISKANDAR PERAK BTW.
So I started looking around for replacement part of the iPhone 4s.
And I stumbled upon this:

JACKPOT!!! A full replacement conversion kit for Apple iPhone 4 l 4S. Just what I needed to safe the day.
This set is compatible with:
iPhone 4 - 8GB / 16GB / 32GB
iPhone 4S - 16Gb / 32GB / 64GB
So without wasting any time I ordered the part and 2 days later it arrived.
I decided to go on with the turquoise green color.

LET THE DIY RECOVERY PROJECT BEGINS!!!
Firstly, let's remove the sim card tray from the iPhone body:

Then let's start removing the screws from the bottom of the iPhone.

Then push the back cover UP and remove it safely.

Then remove the screws that holds the battery connector.

Then remove the battery slowly from the right side of the battery.

Next, take out the antenna dial near the battery connector. Be careful when taking it out as it is very sensitive and if you were to break it, you won't have any antenna signal.
Also remove the 2 screws from the first shield like the one below.

Now is the time to remove the ribbon cable from the logic board of the iPhone. Careful when removing it as it is adhesive to the logic board which makes it a little tricky to remove and it is easy to tear.
Then it is time to take out the speaker. Remove the 2 screws highlighted below. There is a triangle plastic washer on the left side of the screw. PLEASE DO NOT LOSE IT!!!


Next we are going to remove the screws to the EMI shield. There are 4 screws around the EMI shield. They are of different length so remember which screw is which. And there is an extra screw that needed to be removed on the right side of the shield.


And now we proceed with removing the 2nd and final antenna which is the wifi antenna connection. Be careful and take your time when removing it as it is very fragile and a very important piece.

Next remove the EMI shield slowly. as it is a very important piece of the phone. And you will be seeing something just like the image below. Below you can see soo many connectors. For now remove the LCD cable connector and the camera module connector. Also can you see the weird looking screw beside the wifi antenna. Remove it also.

After the camera module have been removed, you have to unscrew 3 more screws that are being highlighted below. Then remove the 3 connectors one by one. The final connector is under the long flex cable. Do be cautious when removing them.

After you have removed all of those above, you can now remove the logic board from the iPhone. Wow its really tiring to do it until here. Do take care when removing the logic board as the cables are still there. You don't want to rip it off right?
It will look just like the picture below.

Now there are only 10 screws left before you can remove the broken LCD screen. Two images below shows the position of the 10 screws that you need to remove. 6 of them comes with washers. Make sure not to lose it.The other 4 are at the corner stone of the bezel. Remove them with care.


Woah!!! Finally the moment that you have been waiting for!!!
**DRUM ROLL PLEASE!!!!!
Taking off the LCD screen...hahaha (^3^)
Woah X3, before I forgot, there is one more thing that you need to remove, the vibration motor. It is quite sticky to remove with a very strong adhesive but don't worry, you can take it out. Remember the screw management, continue doing it just like below or even better.

Now to the real business, pry open the front LCD screen slow but firmly as the adhesive is also quite strong. It will come off eventually no worries. When it comes off its gonna look like this:
So sad seeing the shattered glass (T.T). Turns out it is not as strong as it claimed to be. Well what's done is done. Gotta move on somehow.
AND THAT ENDS THE 1ST PART OF THE DIY TUTORIAL FOR IPHONE 4S DIS ASSEMBLY. ON THE 2ND PART YOU WILL SEE ON HOW TO REASSEMBLE ALL THE PIECES BACK TOGETHER AND GET A LOOK AT THE FINAL PRODUCT.
THANKS FOR YOUR TIME AND SEE YOU ON THE NEXT POST!!!!
The front glass shattered into pieces only hold together by the screen protector
The back is fine BTW.
My heart shattered together with the phone. I do know that the cost is going to be quite high if I were to fix it. I even asked the phone repair shop estimated to as high as RM500 (T.T)
That is way out of my budget and I might as well buy a new phone with that amount of money.
BUT I do love the phone and being apart with it would be the last thing that I would like to do.
Then I figured, "why not I just fix it myself?" It should not be that hard to replace if I know the way around.
WARNING: ONLY DO THIS IF YOU HAVE THE CONFIDENCE TO DO SO. I WOULD NOT BE HELD RESPONSIBLE FOR ANY MISHAP THAT HAPPENS DURING YOUR VERY OWN DIY BUT I CAN ASSURE YOU IF YOU FOLLOW THE STEPS CAREFULLY, THERE SHOULD BE NO PROBLEM ARISE.
PROMOTION: IF YOU WANT ME TO DO THE SERVICE, I CAN DO IT FOR SOME SERVICE CHARGE AND THE COST OF THE REPLACEMENT PART. JUST PM HERE OR CONTACT ME AT MY EMAIL. COD AT SRI ISKANDAR PERAK BTW.
So I started looking around for replacement part of the iPhone 4s.
And I stumbled upon this:
JACKPOT!!! A full replacement conversion kit for Apple iPhone 4 l 4S. Just what I needed to safe the day.
This set is compatible with:
iPhone 4 - 8GB / 16GB / 32GB
iPhone 4S - 16Gb / 32GB / 64GB
So without wasting any time I ordered the part and 2 days later it arrived.
I decided to go on with the turquoise green color.
Very nice isn't it??
LET THE DIY RECOVERY PROJECT BEGINS!!!
Firstly, let's remove the sim card tray from the iPhone body:
Then let's start removing the screws from the bottom of the iPhone.
Then push the back cover UP and remove it safely.
Then remove the screws that holds the battery connector.
Then remove the battery slowly from the right side of the battery.
Next, take out the antenna dial near the battery connector. Be careful when taking it out as it is very sensitive and if you were to break it, you won't have any antenna signal.
Also remove the 2 screws from the first shield like the one below.
Now is the time to remove the ribbon cable from the logic board of the iPhone. Careful when removing it as it is adhesive to the logic board which makes it a little tricky to remove and it is easy to tear.
Then it is time to take out the speaker. Remove the 2 screws highlighted below. There is a triangle plastic washer on the left side of the screw. PLEASE DO NOT LOSE IT!!!
Next we are going to remove the screws to the EMI shield. There are 4 screws around the EMI shield. They are of different length so remember which screw is which. And there is an extra screw that needed to be removed on the right side of the shield.
There is a metal tab underneath the final screw that you remove. Remove it carefully. Before I forgot, below is the picture of the screw management that I have done while doing this DIY. It is very important since you cannot mix up the screws as it may end up destroying the circuit and it is VERY SMALL.
And now we proceed with removing the 2nd and final antenna which is the wifi antenna connection. Be careful and take your time when removing it as it is very fragile and a very important piece.
After the camera module have been removed, you have to unscrew 3 more screws that are being highlighted below. Then remove the 3 connectors one by one. The final connector is under the long flex cable. Do be cautious when removing them.
After you have removed all of those above, you can now remove the logic board from the iPhone. Wow its really tiring to do it until here. Do take care when removing the logic board as the cables are still there. You don't want to rip it off right?
It will look just like the picture below.
Now there are only 10 screws left before you can remove the broken LCD screen. Two images below shows the position of the 10 screws that you need to remove. 6 of them comes with washers. Make sure not to lose it.The other 4 are at the corner stone of the bezel. Remove them with care.
Woah!!! Finally the moment that you have been waiting for!!!
**DRUM ROLL PLEASE!!!!!
Taking off the LCD screen...hahaha (^3^)
Woah X3, before I forgot, there is one more thing that you need to remove, the vibration motor. It is quite sticky to remove with a very strong adhesive but don't worry, you can take it out. Remember the screw management, continue doing it just like below or even better.
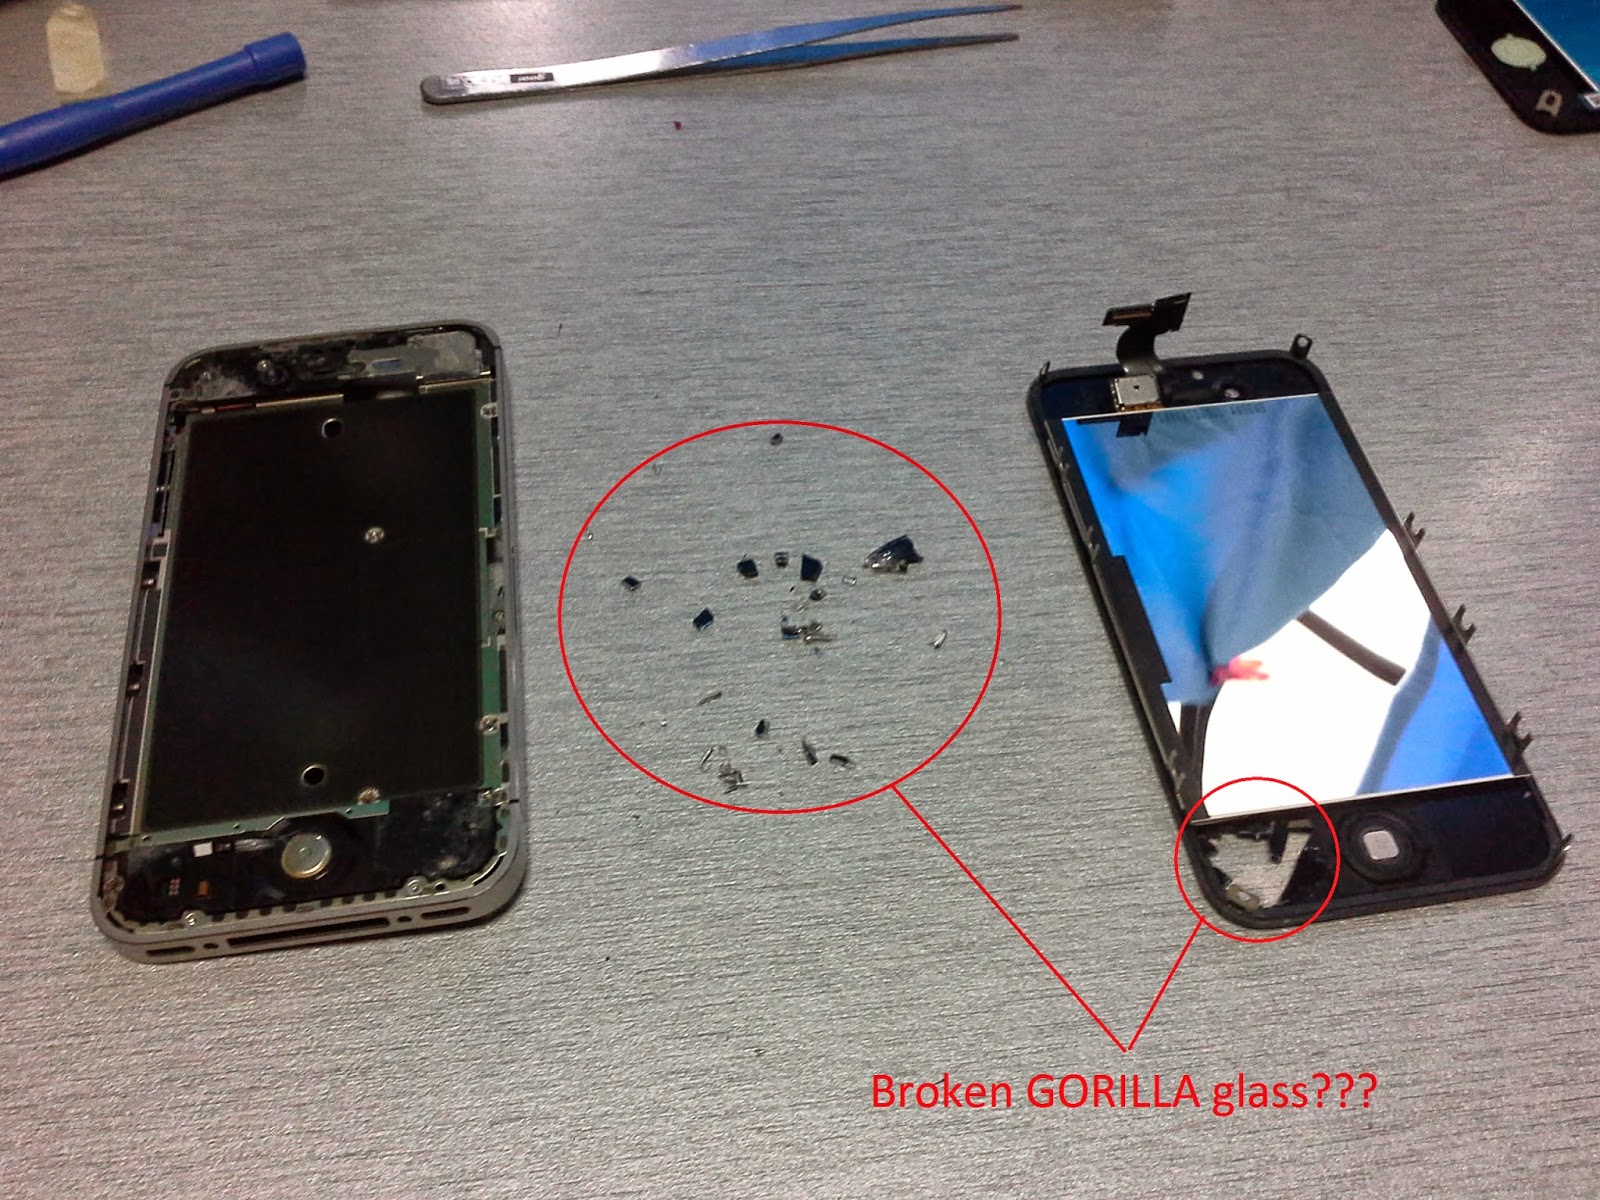
Now to the real business, pry open the front LCD screen slow but firmly as the adhesive is also quite strong. It will come off eventually no worries. When it comes off its gonna look like this:
So sad seeing the shattered glass (T.T). Turns out it is not as strong as it claimed to be. Well what's done is done. Gotta move on somehow.
AND THAT ENDS THE 1ST PART OF THE DIY TUTORIAL FOR IPHONE 4S DIS ASSEMBLY. ON THE 2ND PART YOU WILL SEE ON HOW TO REASSEMBLE ALL THE PIECES BACK TOGETHER AND GET A LOOK AT THE FINAL PRODUCT.
THANKS FOR YOUR TIME AND SEE YOU ON THE NEXT POST!!!!
No comments:
Post a Comment