Hello everyone, sorry it has been quite some time since I last updated this blog. Been busy with the finals and training sessions.
Anyway, today I would like to share something interesting that I have found while surfing the net.
This video is about IKEA's catalog campaign. Indirectly it is also known as a parody to Apple's ad campaign. Its funny really.
Please enjoy the video alright everyone...
Thank you for watching!!! Do wait for my next post alright!!!
Hey guys, SORRY FOR THE LONG ABSENCE. I have been busy with my FINALS AROUND THE CORNER but today I would like to share about an interesting reply regarding the song 'Rude by Magic!'...
This song is really POPULAR currently. Its being played on every radio as well as on your very own phone.
Well for those that haven't heard the song before, here is how the original song sounds like.
Now is the best part!!!
Here is a reply on the song by Benji and Jenna Cowart:
THE DAD'S SIDE OF THE STORY:
with the title 'Magic! Rude Cover (The dad's side of the story)'
INTERESTING ISN'T IT??? :)
Here is the lyrics of the COVER:
"RUDE (A Dad's Response)" Re-write by Benji Cowart
saturday morning you come with out morning wake me up from my bed seeking permission to marry my princess son what's wrong with your big head it's the first time I met you why would I let you run off with my baby girl get back in your pinto it's time that you go the answers no
you say you want my daughter for the rest of your life well you gotta make more than burgers and fries get out your mommas basement boy and get you a life son your twenty eight don't you think it's time
why you gotta call me rude for doing what a dad should do and keep her from a fool like you and if if you marry her anyway
marry that girl I'm gonna punch your face marry that girl I'll make you go away marry that girl at the bottom of a lake ohhhhhh
you may not get this so let me explain it cuz you need to understand this is forever she deserves better she really needs a grown man
I know what you thinking you think you'll still take her give it your best shot I may be a christian but I'll go to prison I'm not afraid of doin hard time
you say you want my daughter for the rest of your life well you gotta make more than burgers and fries get out your mommas basement boy and get you a life son your twenty eight don't you think it's time
why you gotta call me rude for doing what a dad should do and keep her from a fool like you and if if you marry her anyway
marry that girl I'm gonna punch your face marry that girl I'll make you go away marry that girl at the bottom of a lake ohhhhhh
WELL, THERE'S MORE TO IT!!! HAHA!!!
Here is the DAUGHTER'S side of the story:
Magic! - Rude Cover (The daughter's side of the story) by Nicky Costabile
Here is the lyrics:
Saturday Morning, still in my bed Heard the yelling from my room Threw on my clothes and raced like a jet To the porch where I found you
Tension was high, my dad and my man Both claiming possession Just like the old west, a fight for my hand
Can one of you have me for the rest of my life Say no, say no Is this a joke Say no one's gunna own me til the day I die But good luck you guys you both are jerks!
Both of you are being crude You know that I'm a person too Acting like controlling dudes No one asked me for my say
Marry that girl... How bout what I say? Marry that girl... Don't like you anyway.
Marry that girl... Yeah, that'll be the day
Why you gotta be so crude?
Hate that you do this, give me no choice Like an arranged marriage Don't care if you love me, I'm not your toy I'm the one with the leverage I just might run away Do you think that I would stay? Cause you're not okay So listen to me when I say
I belong to no one for the rest of my life Say no, say no Is this a joke Say I decide my husband til the day I die but at this rate I'd rather have no one
Both of you are being crude You know that I'm a person too Acting like controlling dudes No one asked me for my say
Marry that girl... How bout what I say? Marry that girl... Don't you like it anyway?
Why you gotta be so crude?!
THIS IS WHY I LOVE COVERS, IT BRINGS UP A NEW FEELING TO THE SONG AS WELL AS DISPLAYING THE CREATIVITY OF PEOPLE!!!
THAT'S ALL FOR NOW. THANKS FOR READING!!!
**all the videos are credited to youtube and the authors...
As Salam everyone. Thank you for taking your time to go through my blog even though it is still in its early stages. I'm trying my best to keep it as interesting as possible by sharing my knowledge as well as what I am interested at.
This is a special post regarding my 2014 Hari Raya Aidilfitri celebration.
This is a very different raya compared to the previous year because this year, both of my grandfather, "Atuk" (Mother's side) and "Tokki" (Father's side), have gone back to Allah.
(This post is in Malaysian language)
Hari raya kali ini memang berlainan kalau ingin dibandingkan dengan tahun sebelumnya. Pada waktu pagi raya, saya bersama dengan ayah dan adik pergi ke surau taman untuk menunaikan Solat Sunat Aidilfitri.
Setelah selesai Solat Sunat Aidilfitri, kami sekeluarga menjamah juadah yang disediakan oleh ibu di rumah.
Alhamdulillah sungguh sedap masakan ibu. Ibu juga ada membuat lontong untuk hari raya kali ini atas permintaan saya sendiri kerana arwah atuk selalu menghidangkan lontong di hari raya.
Selesai makan, kami pun bergerak pergi ke kubur arwah atuk laki dan arwah atuk perempuan (sebelah ibu).
Seterusnya kami meneruskan perjalanan ke satu lagi tapak perkuburan untuk menjenguk kubur arwah moyang kami.
Setelah selesai menghadiahkan al-fatihah kepada semua yang terlibat, kami pulang ke rumah sebentar untuk bersiap menuju ke kubur "tokki" yang terletak di Kuala Berang, Terengganu.
Tibanya di sana, kami sekeluarga singgah di rumah arwah "tokki" untuk melawat nenek dan saudara mara yang lain. Setelah selesai, kami pun bergerak menuju ke kubur arwah "tokki". Kami menghadiahkan Al-Fatihah dan doa kepada arwah "tokki" agar ditempatkan bersama orang-orang yang soleh dan dekat di sisi Allah.
Selepas itu, kami sekeluarga meneruskan perjalanan menuju ke kubur arwah ibu kepada ayah saya yang terletak di Dungun, Terengganu. Setelah tiba, kami pun terus mengahadiahkan Al-Fatihah kepada arwah nenek. Walaupun saya tidak dapat berjumpa dengan arwah nenek, saya tetap merasa kesedihan yang dirasa oleh ayah saya. Insya-Allah roh arwah nenek juga akan berada bersama-sama dengan orang yang beriman.
Kemudian kami pun melawat rumah sahabat handai ayah dan ibu. Alhamdulillah sihat-sihat semuanya.
Raya kali ni merupakan raya yang sangat berbeza bagi saya. Semuanya berubah secara drastik dengan kehilangan orang yang tersayang. Kehidupan tetap kena diteruskan. Insya-Allah semua yang berlaku ini ada hikmahnya. Semoga saya akan menjadi seorang umat Islam yang lebih baik dan sentiasa mengingati kebesaran Allah selepas ini.
Sampai di sini sahajalah nukilan saya untuk kali ini. Sesungguhnya apa yang tertulis dalam post kali ini hanyalah apa yang dirasakan oleh saya.
THANK YOU FOR YOUR TIME AND KEEP ON SUPPORTING THIS BLOG!!!
OK moving on to the matter at hand, today I would like to explain about the lanes. I am sure that most of you have seen those strange markings on the line. Do you know what it is? Why would they put it on the lanes? Do they have any particular use or just a decoration? Well below is the illustration of the lane:
credit to bowlingball.com for the illustration
It is made up by few key components which are: - Approach - Foul line - Dots - Arrows - Breakpoint - Pins Also for sure you noticed that the lanes have a very specific patterns on them. The boards I mean. As you can see above, the lane is made up of long strips of individual boards. This functions as a counter for the bowlers to count the number of boards. Below are the illustration on the numbering of the board.
As you can see the numbering for a right-handed bowler and left-handed bowler is different. The 1st dot on the approach is 5, then follow by 10, 15, 20 until 35. Good bowlers would use this system to aid their play and further improve their targeting. You can do it too when you have understand this fact. The approach area is where the bowler would stand and take his/her steps to throw the ball. Some uses 4 steps during approach, some uses 5 steps approach. There are even cases of someone using 6-7 steps approach which is way too much from my opinion. The opposite is also true when using less steps during approach. We will get to this matter in another post. Next is the foul line. Your steps must not exceed this line as some lanes and also during official tournament, the sensor is turned on. If you do exceed it, your throw would become invalid and any pin count during that throw is not counted. So, please be careful!!! The dots on the other hand function as a interim target when you throw the ball. Most people think it is hard to consistently throw through the same arrow. The dots function as a first target when you release your ball in order to make it much easier for the ball to go to the desired arrow. Next we move on to the arrows. This is basically the most important part for targeting. The basic arrow to use when throwing a hook is the second arrow counted from the right. The arrows would definitely help new or experienced bowler to hit their target. I would explain further about targeting in another post. Next on the list is the breakpoint. The breakpoint is the point where the ball starts to grip the lane and goes into the direction of the pin. It varies from lane to lane and oil setting. So it is always the best to identify where is the breakpoint in that particular lane. This can be grasped only through proper observation and training but you could see it when the ball you throw started to change direction. Do seek your coach on how to master this aspect.
Last but not least is the pins. You should be familiar with it already as it is what you have been targeting to hit until now... Hehehehe...
Well that is it for now!!! Do check this blog out next time. I will post on more interesting stuff. Thank you for your time!!!!
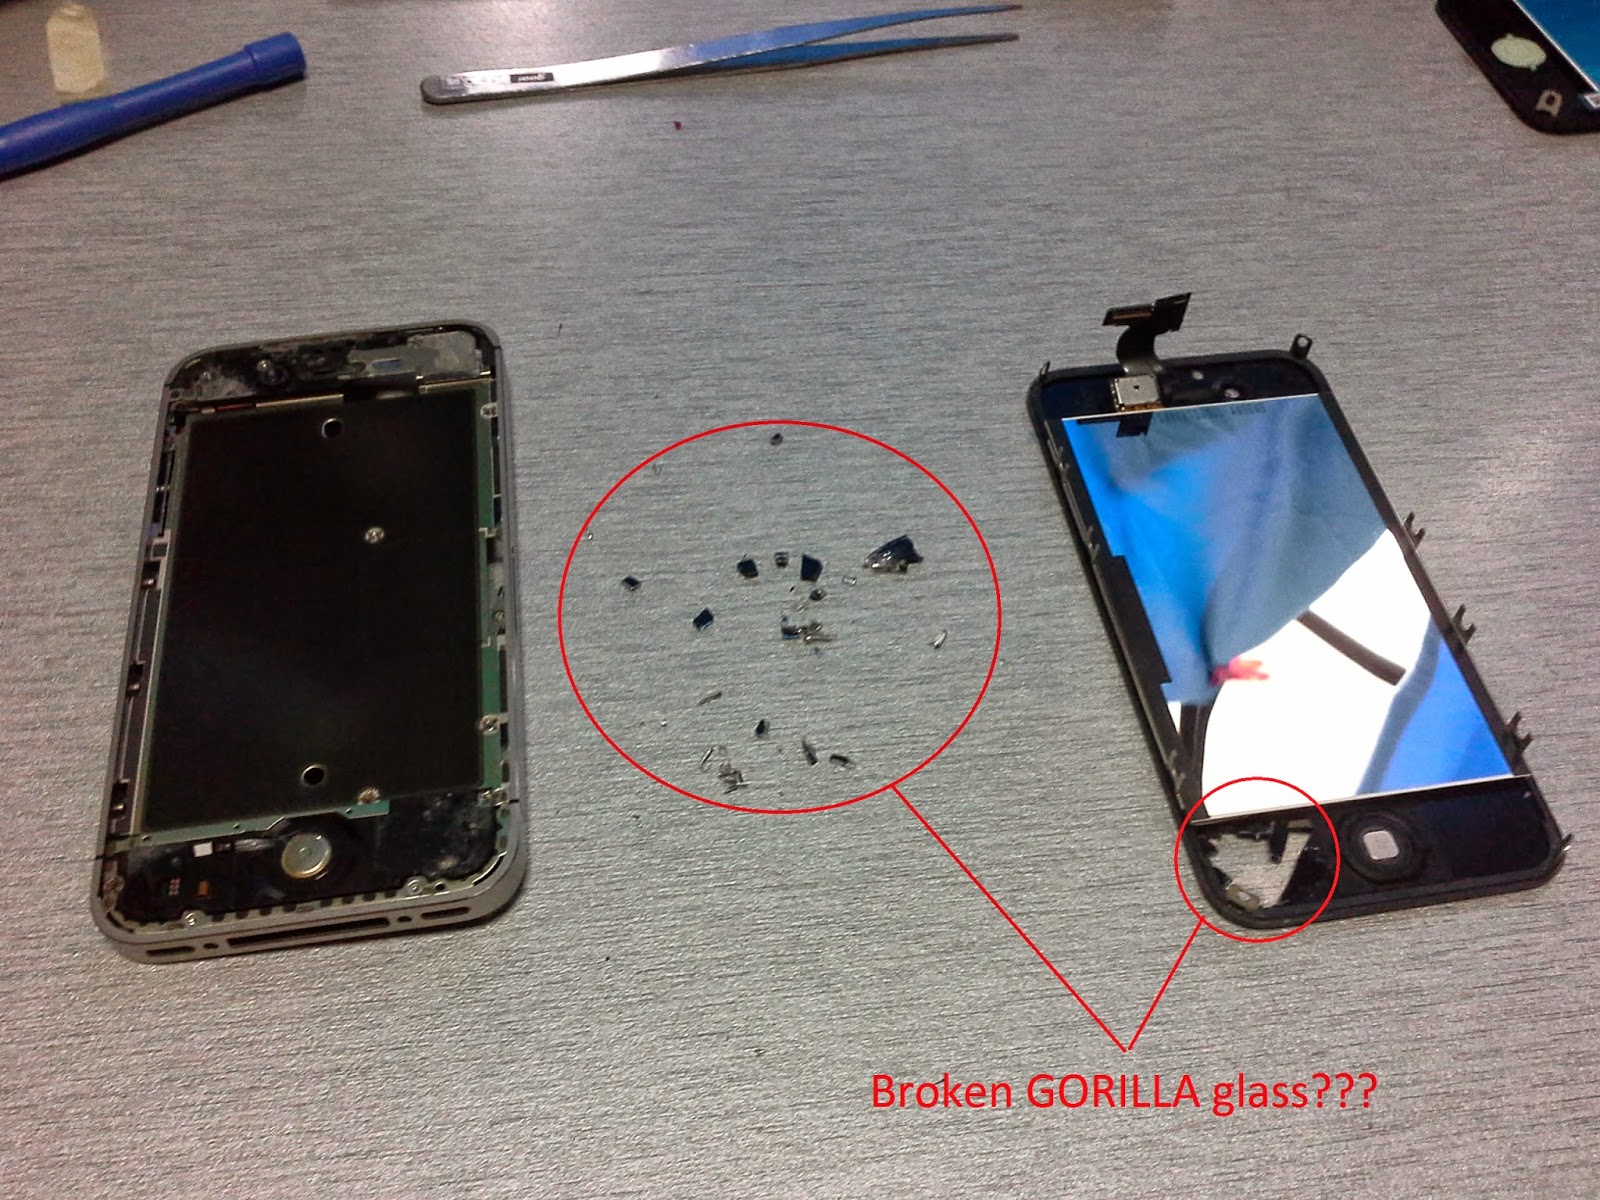
Hey guys, its me again. Sorry for being slow on my blog update. Unfortunately there is an incident that has befall my phone quite some time ago. Below is the picture of it.
The front glass shattered into pieces only hold together by the screen protector
The back is fine BTW.
My heart shattered together with the phone. I do know that the cost is going to be quite high if I were to fix it. I even asked the phone repair shop estimated to as high as RM500 (T.T) That is way out of my budget and I might as well buy a new phone with that amount of money. BUT I do love the phone and being apart with it would be the last thing that I would like to do. Then I figured, "why not I just fix it myself?" It should not be that hard to replace if I know the way around. WARNING: ONLY DO THIS IF YOU HAVE THE CONFIDENCE TO DO SO. I WOULD NOT BE HELD RESPONSIBLE FOR ANY MISHAP THAT HAPPENS DURING YOUR VERY OWN DIY BUT I CAN ASSURE YOU IF YOU FOLLOW THE STEPS CAREFULLY, THERE SHOULD BE NO PROBLEM ARISE.
PROMOTION: IF YOU WANT ME TO DO THE SERVICE, I CAN DO IT FOR SOME SERVICE CHARGE AND THE COST OF THE REPLACEMENT PART. JUST PM HERE OR CONTACT ME AT MY EMAIL. COD AT SRI ISKANDAR PERAK BTW. So I started looking around for replacement part of the iPhone 4s. And I stumbled upon this:
JACKPOT!!! A full replacement conversion kit for Apple iPhone 4 l
4S. Just what I needed to safe the day.
This set is compatible with: iPhone 4 - 8GB / 16GB / 32GB iPhone 4S - 16Gb / 32GB / 64GB
So without wasting any time I ordered the part and 2 days later it arrived.
I decided to go on with the turquoise green color.
Very nice isn't it??
LET THE DIY RECOVERY PROJECT BEGINS!!! Firstly, let's remove the sim card tray from the iPhone body:
Then let's start removing the screws from the bottom of the iPhone.
Then push the back cover UP and remove it safely.
Then remove the screws that holds the battery connector.
Then remove the battery slowly from the right side of the battery.
Next, take out the antenna dial near the battery connector. Be careful when taking it out as it is very sensitive and if you were to break it, you won't have any antenna signal. Also remove the 2 screws from the first shield like the one below.
Now is the time to remove the ribbon cable from the logic board of the iPhone. Careful when removing it as it is adhesive to the logic board which makes it a little tricky to remove and it is easy to tear. Then it is time to take out the speaker. Remove the 2 screws highlighted below. There is a triangle plastic washer on the left side of the screw. PLEASE DO NOT LOSE IT!!!
Next we are going to remove the screws to the EMI shield. There are 4 screws around the EMI shield. They are of different length so remember which screw is which. And there is an extra screw that needed to be removed on the right side of the shield.
There is a metal tab underneath the final screw that you remove. Remove it carefully. Before I forgot, below is the picture of the screw management that I have done while doing this DIY. It is very important since you cannot mix up the screws as it may end up destroying the circuit and it is VERY SMALL.
And now we proceed with removing the 2nd and final antenna which is the wifi antenna connection. Be careful and take your time when removing it as it is very fragile and a very important piece.
Next remove the EMI shield slowly. as it is a very important piece of the phone. And you will be seeing something just like the image below. Below you can see soo many connectors. For now remove the LCD cable connector and the camera module connector. Also can you see the weird looking screw beside the wifi antenna. Remove it also.
After the camera module have been removed, you have to unscrew 3 more screws that are being highlighted below. Then remove the 3 connectors one by one. The final connector is under the long flex cable. Do be cautious when removing them.
After you have removed all of those above, you can now remove the logic board from the iPhone. Wow its really tiring to do it until here. Do take care when removing the logic board as the cables are still there. You don't want to rip it off right? It will look just like the picture below.
Now there are only 10 screws left before you can remove the broken LCD screen. Two images below shows the position of the 10 screws that you need to remove. 6 of them comes with washers. Make sure not to lose it.The other 4 are at the corner stone of the bezel. Remove them with care.
Woah!!! Finally the moment that you have been waiting for!!! **DRUM ROLL PLEASE!!!!! Taking off the LCD screen...hahaha (^3^)
Woah X3, before I forgot, there is one more thing that you need to remove, the vibration motor. It is quite sticky to remove with a very strong adhesive but don't worry, you can take it out. Remember the screw management, continue doing it just like below or even better.
Now to the real business, pry open the front LCD screen slow but firmly as the adhesive is also quite strong. It will come off eventually no worries. When it comes off its gonna look like this:
So sad seeing the shattered glass (T.T). Turns out it is not as strong as it claimed to be. Well what's done is done. Gotta move on somehow. AND THAT ENDS THE 1ST PART OF THE DIY TUTORIAL FOR IPHONE 4S DIS ASSEMBLY. ON THE 2ND PART YOU WILL SEE ON HOW TO REASSEMBLE ALL THE PIECES BACK TOGETHER AND GET A LOOK AT THE FINAL PRODUCT. THANKS FOR YOUR TIME AND SEE YOU ON THE NEXT POST!!!!
I would like to share my main passion with you which is BOWLING!!!
Oh man I am soo excited about this.
Most of you have at least play BOWLING once right?
I'm sure you have seen casual/recreational bowlers scoring from as low as 0 to as high as 150 while regular/professional bowlers from 1++ to 2++. Some even manage to get a perfect game = 300.
BUT do you know how the marks are being calculated?
In today's post, I would like to explain just that.
HOW TO CALCULATE YOUR OWN SCORE.
This is a compulsory knowledge for new bowlers that would like to be serious in their game. By knowing how the scoring system works, you would be able to predict the score that you gonna get.
A game of bowling consists of 10 frames.
Each frame the bowler would have to roll out one or two balls to knock down all the 10 pins in each frame.
Bonus are awarded for getting a STRIKE OR SPARE.
Below are the symbols used in bowling:
Now that you know what the symbols mean, next we continue to the 4 basic principles in a bowling game:
Easy isn't it?
Below is an exercise for you: Just try this exercise and see if you understand it:
Did you get it? Well here is the ANSWER : 179 MY ADVICE: Next time you go bowling ask the counter for the SCORE SHEET and try calculate it yourself!!!
GOOD LUCK TRYING AND KEEP ON FOLLOWING MY NEXT POST ALRIGHT!!!
Hey guys, this is my first step towards blogging. In this blog I would like to share about my PASSION, DIYs, FOODS, ADVICES or anything that interesting to me.
Hope you guys enjoy it and if you have anything that you would like to ask regarding certain things that I could help, I would be glad to help you.
Here is some 'EYE TEASERS' for you. Cuba kira berapa titik hitam dalam gambar ni. :p


.JPG)